
Dermatomes vs Peripheral Nerves
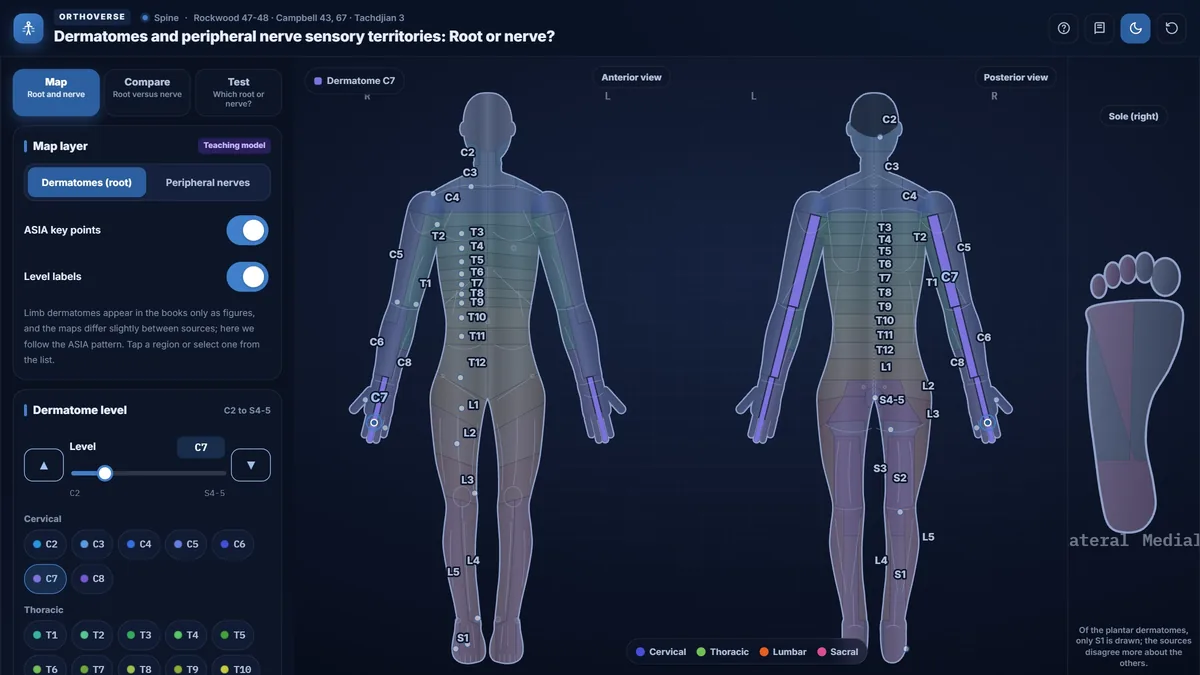
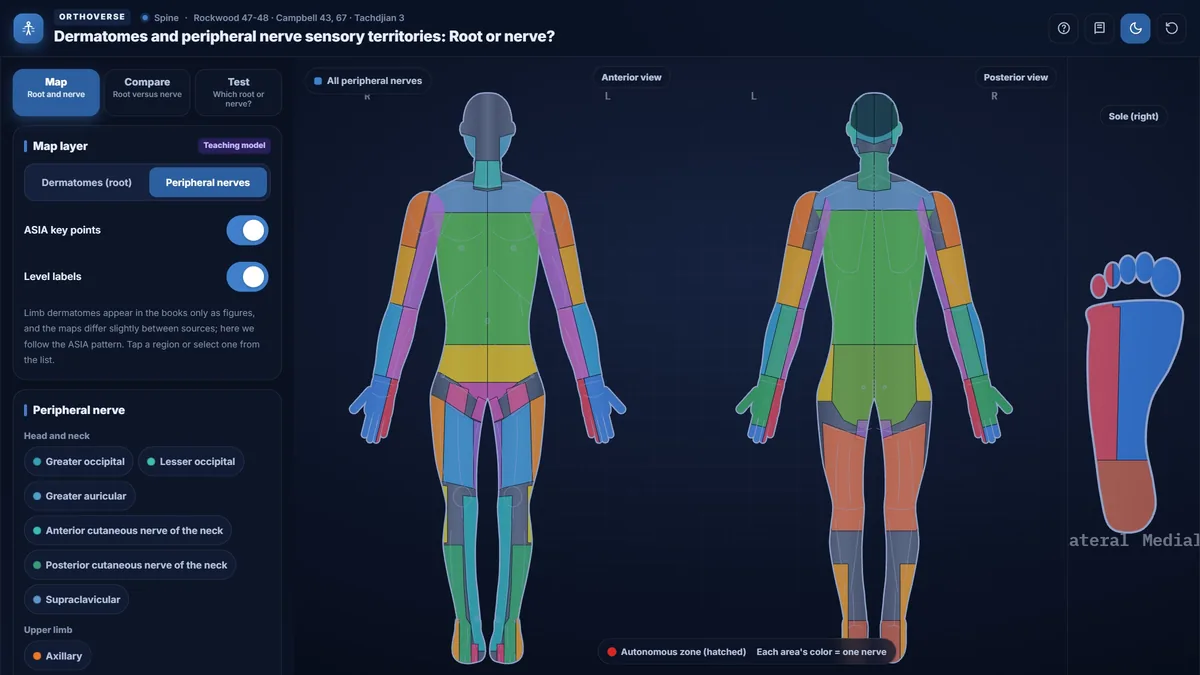
Anterior and posterior body maps with every dermatome from C2 to S4-5, the ASIA key sensory points and the peripheral nerve territories, with a root-versus-nerve comparison and a test.
What you can do
- Step through every dermatome from C2 to S4-5 on anterior and posterior body maps.
- See the ASIA key sensory point for each level.
- Switch to the territories of the peripheral nerves.
- Compare a root with a nerve on the same map.
- Test yourself: which root or which nerve?
Key concepts
A dermatome is the skin supplied by one spinal root; a peripheral nerve territory is the skin supplied by one named nerve, usually carrying fibers from several roots.
The ASIA key sensory points give one reliable test spot for each dermatome.
Telling a root lesion from a peripheral nerve lesion starts with which map the sensory loss follows.
Teaching notes
A dermatome is the strip of skin whose sensory fibers travel through a single spinal root, whereas a peripheral nerve territory is the area supplied by one named nerve that typically carries fibers from several roots. Distinguishing these two patterns at the bedside is the first step in localizing a lesion to the root, the plexus, or a peripheral nerve trunk.
Dermatomes and the ASIA Key Points
Dermatomes run in a predictable sequence from C2, at the occiput, down to S4-5 in the perianal region. On the trunk the bands are nearly horizontal and the boundaries are relatively consistent between individuals. On the limbs the arrangement is more complex because the limb bud rotates during development, and maps differ slightly between sources; the simulator follows the ASIA pattern.
The International Standards for Neurological Classification of Spinal Cord Injury (ISNCSCI) assign one reliable test spot to each level. Widely taught landmarks include the nipple at T4, the xiphoid process at T6, and the umbilicus at T10. For the upper limb, the Rockwood table places the thumb and lateral forearm at C6, the middle finger at C7, and the ring and little fingers with the medial forearm at C8.
- T4: nipple line; T6: xiphoid process; T10: umbilicus; T12: midpoint of the inguinal ligament.
- C5: lateral antecubital fossa; C6: dorsum of the thumb; C7: dorsum of the middle finger; C8: dorsum of the little finger; T1: medial antecubital fossa.
- L2: mid-anterior thigh; L3: medial femoral condyle; L4: medial malleolus; L5: dorsum of the foot over the third metatarsophalangeal joint; S1: lateral heel.
Peripheral Nerve Territories and the Autonomous Zone
A peripheral nerve serves a territory that does not follow root boundaries. The median nerve covers the palmar surface of the thumb, index, and middle fingers and the radial half of the ring finger, plus the dorsal surface of the distal phalanges of the index and middle fingers. The ulnar nerve reaches the little finger and the ulnar half of the ring finger on the palm, and its dorsal branch covers the back of the hand; the medial forearm is spared because it is supplied by the medial antebrachial cutaneous nerve.
Within each peripheral nerve territory, the autonomous zone is the small area supplied exclusively by that nerve, free of overlap from adjacent nerves. Complete pinprick anesthesia confined to the autonomous zone raises suspicion of complete nerve division. The autonomous zone is defined for peripheral nerves, not for roots.
- Median autonomous zone: distal phalanges of the index and middle fingers.
- Ulnar autonomous zone: middle and distal phalanges of the little finger.
- Radial nerve: usually no autonomous zone; if present, it lies over the first dorsal interosseous space.
- An axillary nerve lesion sometimes produces no sensory loss at all; the diagnosis rests on deltoid function.
Root Lesion versus Peripheral Nerve Lesion
The key clinical question is whether the sensory loss follows a dermatomal pattern or a peripheral nerve pattern. A root lesion typically produces a band of numbness extending from the spine to the limb in a segmental strip, and is often accompanied by neck or back pain radiating in a multi-nerve distribution. A peripheral nerve lesion produces numbness confined to one nerve territory, frequently with a wound, local pressure, or entrapment as the cause.
Motor and reflex findings sharpen the localization. The C6 root weakens the biceps and wrist extensors and reduces the brachioradialis reflex; the median nerve at the wrist weakens thenar muscles such as abductor pollicis brevis but leaves the biceps reflex intact. The C8 root shares finger-flexor and intrinsic-hand weakness with the ulnar nerve, but a C8 lesion also involves the median-innervated muscles of the thumb, whereas the ulnar nerve spares them.
Classic Diagnostic Pairs
Several pairs are especially important in the clinic. C6 versus median: both numb the thumb and index finger, but median numbness spares the forearm. C8 versus ulnar: both numb the little finger, but C8 also numbs the medial forearm, which an ulnar lesion spares. L5 versus common fibular: both cause foot drop with dorsal foot numbness, but an L5 root lesion also weakens hip abduction and inversion, muscles that the fibular nerve does not supply. S1 versus tibial: S1 numbs the lateral heel and reduces the Achilles reflex; a tibial nerve lesion numbs the entire sole and medial heel and may produce a trophic ulcer.
The lateral cutaneous nerve of the thigh presents a straightforward case: burning pain on the lateral thigh with no motor deficit, caused by compression near the anterior superior iliac spine (meralgia paresthetica). This must be distinguished from an L2 or L3 root lesion, which would weaken the hip flexors and quadriceps.
Practical Examination Points
ASIA grading of sensation uses three grades: normal, decreased, and absent. Muscle strength is recorded from 0 to 5. The assessment is not necessarily reliable in the first 72 hours after injury. Spinal shock obscures the lesion level; the bulbocavernosus reflex, mediated by S2 to S4, signals its resolution. A lesion of the roots below the cord, such as cauda equina injury, does not produce spinal shock.
- Saddle anesthesia and flaccid anal tone after a burst fracture: cauda equina until proven otherwise.
- Diaphragm paralysis may follow a cord lesion above C5 (phrenic nerve, C3 to C5); ASIA has no key muscles above C5, so these levels are judged by sensation.
- Test the perianal region and voluntary anal sphincter contraction in every complete neurologic examination.
Limitations of Dermatomal Maps
Borders on any printed map are approximations. Overlap between adjacent dermatomes is substantial, especially on the limbs, and individual variation is considerable. The intermediate zone between two root territories receives dual innervation, so partial root lesions may produce patchy or minimal sensory loss there. Radicular pain frequently involves more than one root simultaneously, even when the structural lesion appears single-level on imaging.
Try this in the simulator
- In Map mode, use the slider or arrows to step from C5 to T1 and watch how the key point moves from the lateral antecubital fossa to the medial antecubital fossa.
- Switch the Layer control from 'Dermatomes (root)' to 'Peripheral nerves' and tap the median nerve territory; then tap the ulnar territory to compare their coverage of the hand.
- Open Compare mode and select C6 versus median to see both patterns side by side on one figure, with the autonomous zone hatched in red on the nerve side.
- In Test mode, work through the twelve numb-region questions and check whether each answer follows a root band or a peripheral nerve territory.
- Open the Level card for L5 and read the key muscle (extensor hallucis longus), the key point (dorsum over the third metatarsophalangeal joint), and the carrying nerves listed at the bottom.
Pitfalls
- Numbness confined to the ulnar autonomous zone (middle and distal phalanges of the little finger) strongly suggests complete nerve division, not a root lesion.
- Hip abductor weakness with foot drop excludes the common fibular nerve alone and points to an L5 root or the sciatic nerve.
- The medial forearm is not ulnar territory; it is supplied by the medial antebrachial cutaneous nerve, so medial forearm numbness plus little-finger numbness indicates C8 or the medial cord.
- ASIA sensory levels on the trunk are teaching-model points, not exact clinical borders; overlap and individual variation are greater on real examination.
- Spinal shock may hide the true neurologic level; the examination is not reliably interpreted until the bulbocavernosus reflex has returned.
One-page high-yield card
The key facts, numbers and pitfalls of this simulator on one printable page. Free for personal study.
Further reading
- Rockwood and Green's Fractures in Adults, 10th edition: ch 47 and 48 (spinal cord injury and its assessment).
- Campbell's Operative Orthopaedics, 15th edition (2026): ch 43 and 67.
- Tachdjian's Pediatric Orthopaedics: ch 3 (the neurologic examination).

Designed for Orthoverse by Dr. M. M. Bakhshaei. Built to make orthopedic concepts visible, measurable and easy to explore.
Have an idea for the next simulator?
Tell us which concept you would like to explore. Message our bot and we will read every idea.
For medical education only. Orthoverse simulators are teaching models for health professionals and students. They are simplified on purpose, are not medical devices and are not a substitute for clinical judgement, patient-specific imaging or the original literature.
© 2026 Orthoverse. All rights reserved. The simulators, their code, drawings and models are original work. Free to use for learning on orthoverse.org; copying, embedding, scraping or redistribution is not permitted. Textbook references are cited for further reading only.