
Gap Balancing in TKA
An interactive decision matrix for total knee arthroplasty: change the four cuts and the releases and watch the flexion and extension gaps, laxity and the PCL respond on two linked knee views.
What you can do
- See the flexion gap at 90° and the extension gap at 0° side by side, in frontal and lateral views.
- Change the distal femoral cut, posterior femoral cut, tibial cut, insert thickness and posterior slope.
- Load the classic problems: extension tight, flexion tight, flexion loose, both tight, both loose, tight PCL, femoral internal rotation.
- Use the 3×3 extension/flexion matrix to pick the right tool for each combination.
- Step through varus and valgus releases, flexion contracture and recurvatum, the role of the PCL and femoral rotation.
- Test yourself with board-style cases and a quiz.
Key concepts
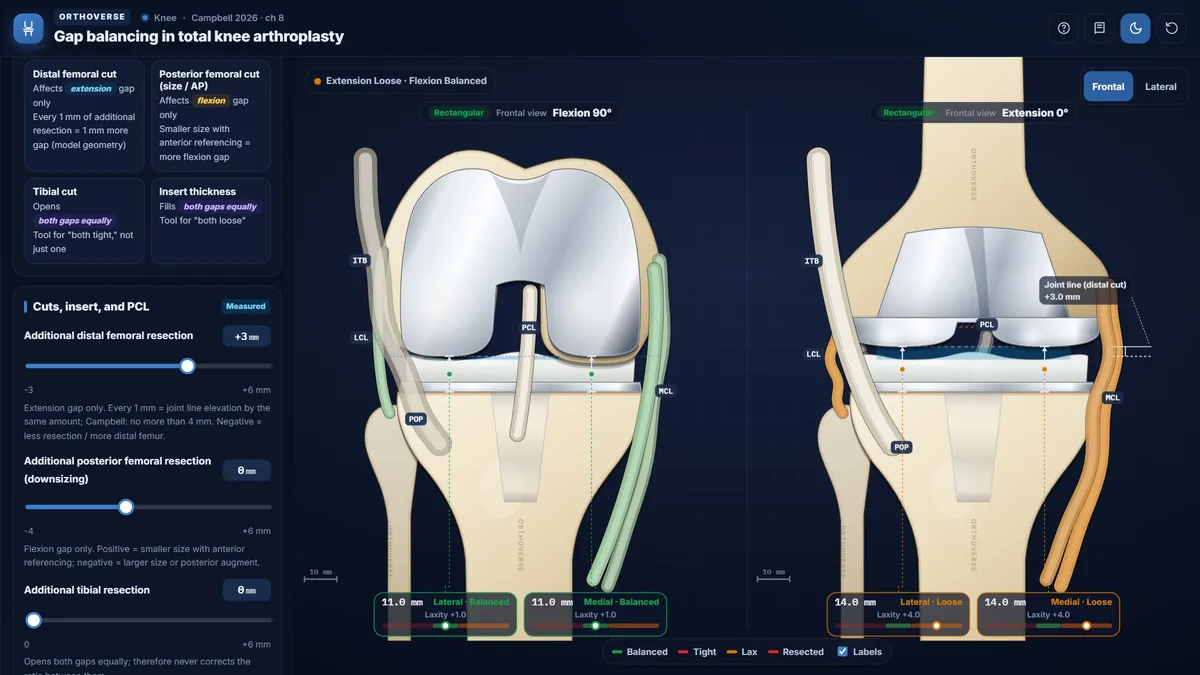
The tibial cut and the insert change both gaps equally; the distal femoral cut changes only the extension gap and the posterior femoral cut (component size) only the flexion gap.
When only one gap is wrong, use the tool that changes only that gap; the tibia is for both tight and a thicker insert for both loose.
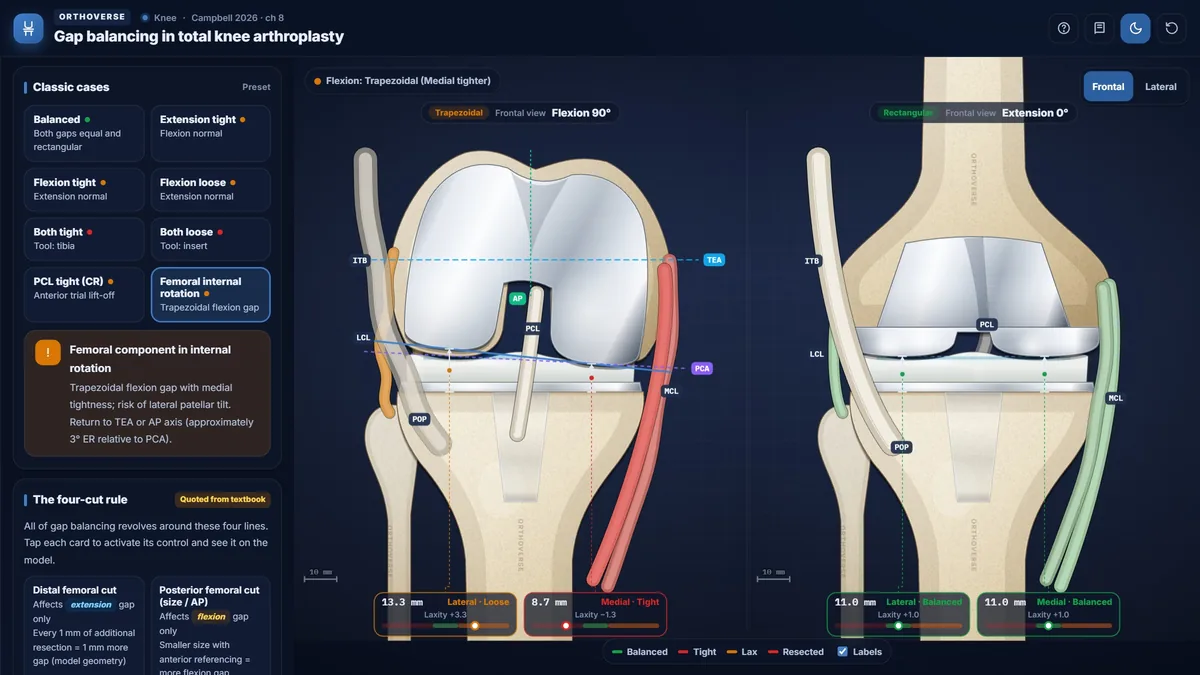
Femoral rotation sets the shape of the flexion gap: internal rotation makes it trapezoidal and tight medially, with a risk of lateral patellar tilt.
Teaching notes
Gap balancing in total knee arthroplasty means achieving equal, rectangular flexion and extension spaces after bone cuts and soft-tissue releases, aiming for 1–2 mm of symmetric laxity. Knowing which tool changes which gap is the foundation of reproducible technique.
The Four-Cut Rule
Four variables govern every gap-balancing decision. The distal femoral cut changes the extension gap only: each additional millimeter of resection opens that space by the same amount and raises the joint line equally. The posterior femoral cut—component size with anterior referencing—changes the flexion gap only: a smaller size resects more posterior condyle and opens flexion without affecting extension. The tibial cut and the insert each alter both gaps equally, so neither can correct a gap ratio; they are the right choice only when both gaps are wrong in the same direction.
The 3×3 Decision Matrix
After standard cuts every knee falls into one of nine cells defined by the extension and flexion gap states. The core rule is to use the tool selective for the gap that is wrong. Extension tight, flexion balanced: remove posterior condylar osteophytes and release the posterior capsule first, then add distal resection in 2 mm increments; the joint line must not rise more than 4 mm, because greater elevation creates mid-flexion instability. Flexion tight, extension balanced: downsize the femoral component with anterior referencing; in a cruciate-retaining knee, also check PCL tension and posterior tibial slope.
- Both tight: additional tibial resection opens both gaps equally.
- Both loose: a thicker insert fills both gaps equally.
- Extension loose, flexion balanced: distal femoral augment; a thicker insert is prohibited.
Coronal Deformity: Varus and Valgus Releases
In a varus knee, posterior structures—the POL, posterior half of the superficial MCL, semimembranosus, and posteromedial capsule—open the extension gap more than the flexion gap; the anterior half of the sMCL and the pes anserinus open the flexion gap more. Identify the position of tightness before each release; over-release leads to coronal instability and the need for a constrained implant.
In a valgus knee, the ITB and posterolateral corner primarily affect the extension gap; the popliteus primarily affects the flexion gap; the LCL affects both. The peroneal nerve lies approximately 1.5 cm from the posterolateral corner—flexing the knee moves it away. When the lateral condyle is hypoplastic, the TEA or AP axis is a more reliable rotation reference than the posterior condylar axis.
Flexion Contracture and Recurvatum
A flexion contracture means the extension gap is too tight. The correct sequence: remove posterior condylar osteophytes, strip the posterior capsule and gastrocnemius origin, then add distal resection in 2 mm increments to a ceiling of 4 mm. In a cruciate-retaining design, PCL release does not help; it only enlarges the flexion gap and worsens the discrepancy.
Recurvatum is the opposite: the extension gap is lax relative to flexion. Reduce distal resection by 2–3 mm and downsize the femoral component with anterior referencing so that more posterior condyle is removed, enlarging the flexion gap to match. A thicker insert alone also tightens the flexion space and does not resolve the imbalance.
The PCL and Femoral Rotation
In a cruciate-retaining design, a tight PCL lifts the trial tray anteriorly in flexion. Stepwise recession begins at the tibial bony island; if unsuccessful, check posterior tibial slope, downsize the femoral component, or sacrifice the PCL and convert to a posterior-stabilized or deep-dish insert. Cadaveric data show that full PCL release opens the flexion gap 4–6 mm and the extension gap less than 2 mm; if more than 75% of the PCL has been released, a more constrained prosthesis is required.
Femoral component rotation shapes the flexion gap. Alignment parallel to the transepicondylar axis (approximately 3° of external rotation from the posterior condylar axis) produces a rectangular flexion gap. Internal rotation tightens the medial flexion gap and risks lateral patellar tilt; excessive external rotation opens the medial side and may cause flexion instability.
Try this in the simulator
- Load the "Extension tight / Flexion normal" preset and move the "Additional distal femoral resection" slider; confirm the flexion gap is unchanged on the live output panel.
- Load "Both tight" and increase "Additional tibial resection"; watch both gaps open equally in the 3×3 matrix, then switch to "Both loose" and add insert thickness.
- In the "Femoral rotation" tab, rotate the component from internal to external relative to the TEA and observe the flexion gap change from trapezoidal to rectangular.
- Activate the "PCL tight (CR)" preset and step through the PCL status control from Tight to Balanced CR; note the anterior lift-off indicator resolve on the lateral view.
- Step through the varus knee release sequence in the "Varus" tab—osteophytes, deep MCL, then POL—and observe which gap responds more at each step.
Pitfalls
- Using tibial resection or a thicker insert when only one gap is wrong: both tools change both gaps equally and disturb the already balanced side.
- Releasing the PCL to treat a flexion contracture in a CR knee: it only enlarges the flexion gap and increases the gap discrepancy.
- Elevating the joint line more than 4 mm: mid-flexion instability becomes likely and patellofemoral mechanics are disrupted.
- Referencing femoral rotation from the PCA in a valgus knee with a hypoplastic lateral condyle: the result is relative internal rotation and lateral patellar tilt.
- Using only a thicker insert to correct recurvatum: the flexion space tightens and the gap asymmetry persists.
One-page high-yield card
The key facts, numbers and pitfalls of this simulator on one printable page. Free for personal study.
Further reading
- Campbell's Operative Orthopaedics, 15th edition (2026): Arthroplasty of the Knee, ch 8 (gap balancing, soft-tissue releases, PCL and femoral rotation).

Designed for Orthoverse by Dr. M. M. Bakhshaei. Built to make orthopedic concepts visible, measurable and easy to explore.
Have an idea for the next simulator?
Tell us which concept you would like to explore. Message our bot and we will read every idea.
For medical education only. Orthoverse simulators are teaching models for health professionals and students. They are simplified on purpose, are not medical devices and are not a substitute for clinical judgement, patient-specific imaging or the original literature.
© 2026 Orthoverse. All rights reserved. The simulators, their code, drawings and models are original work. Free to use for learning on orthoverse.org; copying, embedding, scraping or redistribution is not permitted. Textbook references are cited for further reading only.